Showing posts with label bread. Show all posts

Friday, August 5, 2011

Baking Recipe: Juicy Buns using leftover Doughnut Dough


Ever wonder what can you do with remainder yeast dough? Don't toss it out in the bin as I think that's plain wasteful. I didn't know what to do either at first, so I decided to experiment by piecing some technique I learnt through my bagel making.

Now, do you remember I posted about Peanut Butter and Jelly Doughnuts recently? Well the dough recipe suggested could get more than 20 doughnuts out. For doughnut dough recipe, click here. Since I don't need more than 20 doughnuts, I used the left over dough to make buns.

I think this is such a great switch up. From doughnuts to dinner rolls or use the buns for breakfast or lunch. Pair it with chicken mayo, tuna, ham or even a fried egg. The bun is really light and fluffy on the inside. Plus it can be stored up to a week in a fridge. Just pop it back in the microwave, heat up for about 10-20 seconds. I assure you that you still get to enjoy the freshness of the bun as it's not like the store bought ones where it will dry out after a day or two. Enjoy and have a great weekend!

Here are the simple steps.

To prepare and bake the bun:

1. Preheat oven to 190 Celsius.

2. Roll remainder dough to any shape you like, set it aside for another 15- 20 minutes and cover with the dry cloth to allow it to rise.

3. Meanwhile, cover a tray with parchment paper and  boil some water in a deep pot. When water is boiling, turn down the heat slightly, and gently drop 1 rolled out bun at a time, and cook it for just 1 minute. Take it out and set it on your baking tray. Do the same for the remainder.

4. Lightly beat 1 egg and egg wash the buns. I would recommend some egg wash as it will give you a glossy brown shine when bun is baked. Now go creative. Add some sliced almonds, sesame seeds or poppy seed or any topping of your choice.

5. Bake the buns for about 20 minutes or until golden brown in colour.

*Some tips I discovered*

Freezing dough
  • I wouldn't recommend to freeze the dough, unless the dough you prepared is meant for freezing. It's because I read somewhere that you will need to double the amount of yeast, as yeast might die during freezing stage.
  • To thaw: Set it out on a tray line with parchment paper, cover with a greased cling film (e.g: vegetable shortening), then thaw dough in the fridge overnight and let it rise again (approx 2 1/2 hours) slightly longer than the usual 1 1/2 hours before working them in to your bread, then cover with cloth and set aside for another 20 minutes to allow it to rise again.
To store in fridge and use later

  • You can roll out bread to your desired shape or choose to roll later. Just make sure to cover with cling film wrap and put it in a zipper lock bag.
  • To thaw: Set ready rolled bread on to a tray line with parchment paper, cover with a cloth to allow it to rise (approx. 20-30 minutes) and then bake them accordingly. For non-ready roll breads, thaw and let dough rise (approx. 30 minutes), work the dough by punching slightly, and roll into desired shape. Cover with cloth and set aside for another 20 minutes to allow it to rise.
Hope this helps, for more tips click here.

xx

Monday, July 25, 2011

Baking Recipe: Tana Ramsay's Home-made Bagels


Tana Ramsay's Real Family Food cookbook, wife of the toughie Chef Gordon Ramsay. In my opinion, he swears too much and that's quite a turn off. However, I'm sure he's a reliable chef. Now this book is more on home cook meals. Really ideal for singles like me, family and friends as well as parents with young ones. There will be a recipe for everybody am sure.

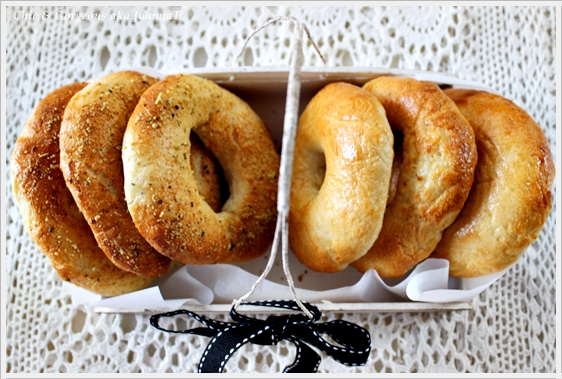
As I'm drafting this post, my whole house is filled with the most intoxicating smell of bagels baking away in my oven. Gosh, you really have to try this.When I saw Tana's bagel recipe, I knew I had to try it out. Ever since I kneaded my pizza dough, I'm now more eager on kneading other form of breads. Having the bagel turn out perfect will be another sense of accomplishment.

Something to work on: Not make the hole in the middle of bagel bigger. I just had to even out the thickness of bagel and that made the hole bigger [sigh..]. Note to self on next time, just leave the bagel as it is . Should have listen to Tana's advise when she said and I quote after her " Resist perfection at this point or you'll go mad". I certainly can relate to that and am definitely going to make them again and make sure I improve my skill.

This is my first time trying out this bagel recipe. So if you have other true and tested recipe that you constantly turn too, feel free to share them here ;). The texture of bagel? Crunchy on the outside, soft and chewy on the inside. Lovely.. Nothing beats a freshly baked bread from the ovens of your home. Enjoy!

Recipe:
Adapted from Tana Ramsay's Real Family Food
yields 10 bagels

Note: I made 5 plain bagels with just egg washed and another 5 sprinkled with some mixed herbs and grated Parmesan.

For the bagel:

3 tbsp dry yeast
2 tbsp caster sugar
125ml warm water
250ml warm milk
450g plain flour/ all purpose flour, sifted
3 tsp salt
1 egg, lightly beaten

To prepare the bagel:

1. Put yeast, 1 tablespoon sugar, milk and water in a bowl. Lightly whisk the yeast until it's dissolved. Place a side at a warm place for about 10-15 minutes until it begins to form bubbles.

2. Next in a large mixing bowl, add flour. salt, and the remaining of sugar. Create a well and pour yeast mixture into flour. Using a wooden spoon or spatula, mix flour and yeast mixture until well combine.

3. Turn the dough out onto a floured surface and knead for another 5-10 minutes until it is smooth and elastic whereby dough will no longer stick to your fingers.

4. Place dough into a large bowl and cover with a damp tea towel and stand in a warm place for approximately 1 hour until it has doubled up in size. Be careful to not leave it for too long. Otherwise it will form a hard crust on the top which stops the dough from rising.

5. Flour the work surface and turn out the dough. Knead it for another 1-2 minute and divide into 10 equal balls.

6. Lay parchment paper on baking tray. Using your thumb, make a hole in the middle of each ball and massagee into a bagel shape. The hole in the centre should be approximately 2.5cm/1 inch in diameter and there should be equal thickness in the edges all around.

7. Place rolled bagels on baking tray and  cover with a damp tea towel and leave in a warm place for another 20 minutes to allow it to rise again.

8. Preheat oven to 190 Celsius or 375 Fahrenheit.

9. Bring a pot of water to a boil and lower bagels in batches into the water. Blanch them for about 1 minute, remove and place them back onto baking tray.

10. Brush top of bagel with some egg wash and sprinkle your desired seeds or herbs. Bake them for about 20-25 minutes or until they are golden brown in colour. Transfer to a cooling rack. Bagel is best consumed within 2 days. Preheat it back in the microwave and you're set to go with your breakfast or lunch. Enjoy!

xx
Related Posts Plugin for WordPress, Blogger...