Showing posts with label chic gorgeous. Show all posts
Wednesday, August 24, 2011
Facebook Page: Chic & Gorgeous Treats has joined the band wagon!!
Hey Everyone!
Chic & Gorgeous Treats now have a Facebook page. So if you do enjoy my blog, do support me on Facebook and add me as a friend too. Good to stay in touch and become one huge foodie family. I will be thrilled to know that you're a fan of my page.
If you have a Facebook page too, drop me a line under comment and I will definitely come knocking on your door. Happy cooking and baking and thanking you in advance for your support!!
Facebook URL: https://www.facebook.com/pages/Chic-Gorgeous-Treats/200155216713698
xx
Saturday, July 30, 2011
Dessert Recipe: Bon Anniversaire ChicGorgeous & Kiwi-Orange Creamsicles
Woo hoo.. for she's a jolly good fellow.. for she's a jolly good fellow.. for she's a jolly good fellow..[ya da..la la..di..da!] Chic & Gorgeous Treats is now 1 years old. Wow.. has it been a year? Time is really flying. I keep saying this every single day. It just feel like the earth clock has speed up the time. Don't you?
It has been a lot of ups and down plus a couple of months I went MIA. It's because I was just tired and lost some of my motivation to up keep the blog. However, many thanks to my loyal blogger friends and personal friends for poking me left and right making sure I don't give up. That is something I value at heart and treasure most. So here's a shout out to Elisabeth from Food and Thrift Finds and Pei Li from Pei Li Miniatures, THANK YOU for constantly stopping by to check on me. As for new foodie friends, I'm glad that I've found you and in return that you've spread the word about me or stumble upon me. For once I know you guys and gals are reading and that made me want to write even more, sharing my views on tested recipes.
Now this post is deeply inspired by Stephanie from Desserts for Breakfast. I remembered sometime ago, I tagged Stephanie and she gave me a shout out at her blog too. I may not know her personally, but boy oh! boy her dessert making and photography skills is to die for, if I say so. I thought it would be fun to celebrate my blog anniversary with a twist. Instead of a cake or tart, I think it's more fun to serve creamsicles or ice lollies or ice cream in a matter of fact. For recipe click here as I think it's only rightful of me to link it back to Stephanie from Desserts for Breakfast. When I saw that orange and kiwi is involved, I knew I just had to make them as orange is my no.1 favourite juice and kiwi is packed with vitamins. Put them together, I bet we can conquer cough an cold anytime. And what can I say further? A PERFECT Summer treat. The balance of vanilla cream, kiwi and orange is refreshing, light and will sure have you asking for more.
I think I'm going to take a break now and enjoy licking my Kiwi-Orange Creamsicles! Yummmm.. YummmMMmm.
P/S: Do stay tune for the new Chic & Gorgeous Treats and I'm truly happy that I now have 30 followers. To the 30th follower, you made it happen too and I hope there will be more followers to come. So keep them coming and I will certainly do my best to write more interesting food topics ;)!!
xx
Tuesday, July 26, 2011
Baking Recipe: Peanut Butter & Jelly Doughnuts
It's now doughnut time.. What could be screaming in my head? Peanut Butter and Jelly of course. This was also another staple breakfast I had as a child. Looks like this week's gonna be a lot about dough huh? Yes.. I admit.. I really am addicted in kneading dough right now. Well of course we can always use the Kitchen Aid dough hook. But then... I don't know why I like giving myself more work. I do it manually.. Yup.. you got that right. I mix the batter with a wooden spoon etc. Bottom line, I really do enjoy getting my hands dirty.. doing all the work. It's sticky but at the end, you really get a soft, elastic and smooth dough. The feeling is FANTASTIC. Do try it some time to release some stress if needed ;).
This time round, the recipe is adapted from another fellow blogger who's also on FoodBuzz [drumrolls..] Recipe's from Lindsey at Gingerbread Bagels. How cute is that? In fact this was part of the Daring Baker's Challenge. Double fun!! I took on the challenge myself since I'm not part of the group. I cannot believe my eyes that I'm making doughnuts. I'm evolving.. Yeayyy!!
Okay, I think I wouldn't paste the recipe here, and would like to link it to Lindsey's blog instead. So for recipe, click here. However, I will not leave you empty handed, and would like to share a couple of tips or what I thought about the recipe.
Here goes ;):
- Recipe yields slightly more than 2 dozens of small-medium size doughnuts. Refer photos above. I'm not a big fan of large treats, and that could probably explain why I always get more out of what the recipe calls for.
- I made 20 medium doughnuts, and the remainder is a surprise. Will share with you more on that later on.
- If using a wooden spoon to mix flour and yeast, that requires a little arm strength. Persevere, as you just need to make sure the mixture combines together. Flour your work surface and hands with adequate flour. Knead the dough for about 5-10 minutes [usually close to 10 minutes] or until when is no longer sticky but elastic and smooth to touch. Work with a timer if that helps as I find that useful.
- Make sure to always cover dough with damp cloth or I prefer a cling film wrapped tightly around the bowl and rest dough according to suggested time to allow it to rise.
- If you do not have a cooking termometer, and not sure if oil is hot enough? Take a tiny rolled dough and drop it into the oil. If it sizzles and floats up, your oil is ready to go.
- While frying the doughnuts, if you notice they are burning faster, turn down the heat. Then turn it back up if it cools down too much. I suggest fry 1 at a time. This way you can control how golden the doughnut turns out. Also it gives you enough room to take out the doughnut if it starts burning.
- Taste your peanut butter filling. I don't really like my treats overly sweet, so I always keep it to a minimal amount of powdered sugar as suggested. Use a small knife to make a small hole in the doughnut, piping bag and a regular Wilton tip to pipe filling. Clean off excess filling so it does not spill out.
At the end, you will get a light crispy soft chewy doughnut [YummmmMmm..]. Enjoy!!
xx
Monday, July 25, 2011
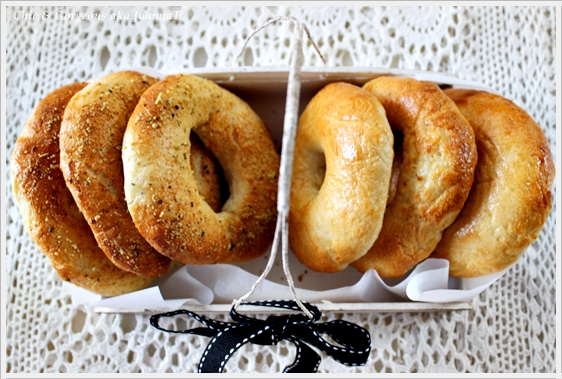
Baking Recipe: Tana Ramsay's Home-made Bagels
Tana Ramsay's Real Family Food cookbook, wife of the toughie Chef Gordon Ramsay. In my opinion, he swears too much and that's quite a turn off. However, I'm sure he's a reliable chef. Now this book is more on home cook meals. Really ideal for singles like me, family and friends as well as parents with young ones. There will be a recipe for everybody am sure.
As I'm drafting this post, my whole house is filled with the most intoxicating smell of bagels baking away in my oven. Gosh, you really have to try this.When I saw Tana's bagel recipe, I knew I had to try it out. Ever since I kneaded my pizza dough, I'm now more eager on kneading other form of breads. Having the bagel turn out perfect will be another sense of accomplishment.
Something to work on: Not make the hole in the middle of bagel bigger. I just had to even out the thickness of bagel and that made the hole bigger [sigh..]. Note to self on next time, just leave the bagel as it is . Should have listen to Tana's advise when she said and I quote after her " Resist perfection at this point or you'll go mad". I certainly can relate to that and am definitely going to make them again and make sure I improve my skill.
This is my first time trying out this bagel recipe. So if you have other true and tested recipe that you constantly turn too, feel free to share them here ;). The texture of bagel? Crunchy on the outside, soft and chewy on the inside. Lovely.. Nothing beats a freshly baked bread from the ovens of your home. Enjoy!
Recipe:
Adapted from Tana Ramsay's Real Family Food
yields 10 bagels
Note: I made 5 plain bagels with just egg washed and another 5 sprinkled with some mixed herbs and grated Parmesan.
For the bagel:
3 tbsp dry yeast
2 tbsp caster sugar
125ml warm water
250ml warm milk
450g plain flour/ all purpose flour, sifted
3 tsp salt
1 egg, lightly beaten
To prepare the bagel:
1. Put yeast, 1 tablespoon sugar, milk and water in a bowl. Lightly whisk the yeast until it's dissolved. Place a side at a warm place for about 10-15 minutes until it begins to form bubbles.
2. Next in a large mixing bowl, add flour. salt, and the remaining of sugar. Create a well and pour yeast mixture into flour. Using a wooden spoon or spatula, mix flour and yeast mixture until well combine.
3. Turn the dough out onto a floured surface and knead for another 5-10 minutes until it is smooth and elastic whereby dough will no longer stick to your fingers.
4. Place dough into a large bowl and cover with a damp tea towel and stand in a warm place for approximately 1 hour until it has doubled up in size. Be careful to not leave it for too long. Otherwise it will form a hard crust on the top which stops the dough from rising.
5. Flour the work surface and turn out the dough. Knead it for another 1-2 minute and divide into 10 equal balls.
6. Lay parchment paper on baking tray. Using your thumb, make a hole in the middle of each ball and massagee into a bagel shape. The hole in the centre should be approximately 2.5cm/1 inch in diameter and there should be equal thickness in the edges all around.
7. Place rolled bagels on baking tray and cover with a damp tea towel and leave in a warm place for another 20 minutes to allow it to rise again.
8. Preheat oven to 190 Celsius or 375 Fahrenheit.
9. Bring a pot of water to a boil and lower bagels in batches into the water. Blanch them for about 1 minute, remove and place them back onto baking tray.
10. Brush top of bagel with some egg wash and sprinkle your desired seeds or herbs. Bake them for about 20-25 minutes or until they are golden brown in colour. Transfer to a cooling rack. Bagel is best consumed within 2 days. Preheat it back in the microwave and you're set to go with your breakfast or lunch. Enjoy!
xx
Labels:
bagel,
baking recipe,
bread,
chic and gorgeous,
chic gorgeous,
tana ramsay
Sunday, July 3, 2011
Cooking Recipe: Grilled Teriyaki Chicken Spaghetti
I thought of having some fun, cooking something different and not with tomato puree or pesto. This may not be the conventional pasta dish; however I assure you it's full with flavour. It's light and smokey.
I had a friend coming over for lunch and the both of us were craving for some pasta. Instead of sharing with you some of my sweets, I like to steer away for a moment to share with you my lunch.
When I cooked this meal, I was thinking along the lines of fusion. Not quite sure what fusion is really all about but I think this dish certainly fits under the mixture of east meets west. Hence, it's fusion in my brain.
For chicken lovers, you might enjoy this dish as much I did. However, please be warn that there isn't a specific recipe to be honest. It's a couple of flavours concoct in my head, and transcend into my dish. The flavours of the pasta and chicken marry really well together. A perfect union in my opinion. If you love the smokey taste of teriyaki, do read on and cook yourself a lovely meal. Enjoy!
Recipe
approx. for 4 persons
Note: The amount of chicken specified is a rough estimation of consumption per pax. Please feel free to increase the amount of meat required. If you do so, make sure to increase the amount of marinade according to taste. Do not oil the griddle and always oil the meat. Also, make sure to rest grilled chicken fillets before slicing them. This will allow the juice to flow back into the meat. As for the amount of oil used for the spaghetti, that will be a rough estimation, as it depends on the amount of pasta you are cooking.
For teriyaki chicken
8 chicken fillets, or 4 chicken breasts slice into halves
6-8 tbsp Kikkoman Original teriyaki sauce
3-5 tsp honey
salt, to taste
black ground pepper, to taste
1 clove garlic, diced
extra virgin olive oil
For spaghetti, aglio olio style
1/4-1/3 packet of spaghetti
4 tbsp, about 60 ml extra virgin olive oil
1tbsp butter
5 tsps ground cumin
5 tsps ground coriander
1 red chili, seeded and sliced thinly
3 shallots, sliced thinly
1 clove garlic, diced
1 tsp sugar, to taste
a couple dashes of Worcestershire sauce
salt, to taste
black pepper, to taste
1tbsp red capsicum and tomato chutney/ relish (optional)
To prepare teriyaki chicken:
1. In a bowl, or zip lock bag, mix all ingredients together to marinade chicken. Rub marinade onto chicken fillet, set a side and leave it to rest. For better taste, marinade the day before or a couple hours earlier.
2. In a smaller separate bowl, mix extra terikayi sauce, honey and extra virgin olive oil. This will be used later to coat the chicken fillet while grilling.
3. With a griddle, grill one slice of chicken fillet at a time. Approximately 4 minutes of each side or grill chicken until it's fully cooked. Using a pastry brush, brush the extra prepared marinade mixture over chicken fillet. This will help caramelised the chicken and seal in the smokey teriyaki flavour.
4. Transfer grilled chicken to a plate to rest before slicing.
To prepare spaghetti:
1. Cook spaghetti according to the instructions stated behind the packet. Or in a deep pot, boil water and add in salt to the water. When water is boiling, toss in spaghetti and cook for about 10 minutes. It should be al-dente. Strain away the water and pour some olive oil and drizzle some Worcestershire sauce over the spaghetti and mix it around. This will prevent the pasta from sticking.
2. In a separate pan, heat up extra virgin olive oil and butter together. This will prevent butter from burning. Cook cumin, coriander until they are fragrant (approx 1 min) and then immediately toss in shallots, chili then followed by the garlic and cook for another 2 minutes. If heat is too hot, it will burn the garlic; so do turn the heat down if required, while cooking all of the above.
3. Add in the tomato and red capsicum relish/ chutney and add a couple dashes of Worcestershire sauce. You should be able to see a mixture of extra virgin olive oil and from the tomato and red capsicum chutney/relish. Finish up by adding some salt, black pepper and sugar to balance off the flavours.
4. Turn the heat down and toss in the spaghetti. Give it a good mix and turn the heat back up and mix for another 2-3 minutes.
5. Serve while still warm and drizzle some of the teriyaki sauce from the chicken over the spaghetti, if you like.
xx
Labels:
chic and gorgeous,
chic gorgeous,
cooking recipe,
honey,
recipe,
spaghetti,
teriyaki,
teriyaki chicken,
teriyaki sauce
Monday, June 27, 2011
Baking Recipe: Heavenly Mango Mousse Cake
Mango is in season, and every week lately there will be a basket full in my kitchen. How lucky am I? Frankly, mango is definitely one of my go to fruits whenever I've a craving for something sweet. It's rich, juicy and bursting with flavour.
I realised I've always been working with international fruits so much so that I decided it's time I worked with a fruit which is also grown locally and found in our local farmers market. Just in case you didn't know, mangoes are grown in Malaysia too, due to the beautiful tropical weather. In a way, we are pretty lucky people to be able to enjoy the fruit whole year round.
So over the weekend, I've been experimenting with mango. I have always wanted to try my hands on making a rich yet light mango cake. Bear in mind I do have a family who love their sweets but not too sweet. So it's always a challenge to find a perfect balance between sweetness and richness of a dessert without losing all it's elements. I baked a 3 layered cake with one layer sandwiched with mango mousse and another layer sandwiched with fresh cream and mango. Overall cake is frosted with light meringue butter cream.
Thus, what I have put together in the cake is what I feel in my opinion; arguably one of the best mango cake that you have ever taste. Although the recipes are not mine per say, however I always go to my trusted and tested recipes whenever I try to put a cake together. If you love mango plus it's another perfect summer treat, do read on for the recipe. I am sure your friends and family will be asking for seconds to third helpings. Enjoy!
Recipe
For white butter cake
adapted from Joy of Baking
Note: I tweaked the amount of milk, to get a moist butter cake. The recipe below is perfect for a 3 layered 6-inches cake.
2 large eggs, separated
1 3/4 cups sifted cake flour
2 teaspoons baking powder
1/4 teaspoon salt
1/2 cup unsalted butter, at room temperature
1 cup caster sugar, divided
1-2 teaspoon pure vanilla extract
1/2 cup + 1tbsp milk
1/8 teaspoon cream of tartar
To prepare white butter cake:
1. Preheat oven at 350 degrees approx 177-180 Celsius. Grease 2 6-inches round cake pan and line with parchment paper. With a whisk and clean mixing bowl, whisk egg whites until foamy. Then add in cream of tartar and 1/4 cup sugar and continue to whisk until stiff peaks forms. Transfer to another bowl, if you do not have a spare mixing bowl.
2. In a separate bowl, mix cake flour, salt, and baking flour together. Next, change to a paddle attachment, beat butter and remainder of 3/4 cup sugar at medium speed until light, creamy and fluffy.
3. Add egg yolks, one at a time, beating after each addition. Scrape down the sides of the bowl. Next, add the vanilla extract and beat until combined. Divide cake flour mixture to 3 additions, starting with milk and ending with flour and continue mixing until well combined.
4. With a rubber spatula, gently fold in beaten egg whites into cake batter, and fold until well combine. Careful to not over mix and lose all the air. Otherwise cake will deflate.
5. Bake for 25-30 minutes or until a skewer or toothpick inserted comes out clean. Set aside to cool before transferring to a wire rack to cool off completely.
For the mango mousse
adapted from Tartellete
Note: Use any mango that is available in your supermarket. It can be the Indian mango, Thai mango etc.
Preferably the Thai mango, if you must as it's naturally sweet and juicy. I made my own puree as I couldn't locate it in my supermarket.
To make your own puree, slice 1 mango into cubes. The flesh from the seed can be used too. However it has loads of fibre, therefore, try not to slice onto the seed. With a food processor or blender, puree the mango. Sieve it through a sieve and follow further instructions below to make your mango mousse.
1 1/2 teaspoons powdered gelatin
1 tbsp water
4 oz (120gr) mango puree
2 tbsps sugar
1/2 cup (125ml) heavy cream, cold
To prepare mango mousse:
1. Sprinkle the gelatin over the water in a small bowl and let it soften while you prepare the fruit.
2. In a medium saucepan, bring the mango puree and sugar to a simmer. Remove from the heat and add in the softened gelatin. Stir until the gelatin is completely melted.
3. Transfer the fruit puree to a large bowl and let it cool down to room temperature.
4. Using a whisk attachment attached to the mixer, whip the cream on medium speed until soft peaks form. Fold about 1/3 of the whipped cream into the fruit puree to lighten it up (do not worry about losing air at this point). Carefully fold in the rest of the whipped cream. You will notice that the mixture appears a little runny. Cover mousse with cling film wrap. To help it set nicely to a spreading consistency, do chill it in the refrigerator for about 15-20 minutes before spreading it over the cake.
For fresh cream and mango chunks layer
1/2 cup heavy cream, cold
3 tbsp powdered sugar
1/2 a mango, sliced into cubes
To prepare whipped cream:
1. With a whisk attachment, whisk heavy cream and powdered sugar until stiff peak forms.
For light meringue butter cream
2 large white eggs
1/2 cup sugar
1 1/2 sticks unsalted butter, softened and cut into cubes
4-5 tsps lemon juice
1-2 tsp pure clear vanilla extract
To prepare meringue butter cream frosting:
1. Mix whites and sugar in a mixer bowl set over a pan of simmering water. Heat, whisking constantly until sugar dissolves for approx. 2-3 mins and mixture is warm.
2. Remove from heat. With a whisk attachment, whisk on high speed until stiff peaks form, for about 5 minutes. Add butter, several cubes at a time, whisking after each addition. Add lemon juice and vanilla then beat for another 2 minutes, scrapping down sides of bowl when needed.
To assemble cake:
1. Slice one of the cake into half. Use the thicker baked cake as the base. Spread a thin layer of whipped cream. Layer cut mango cubes evenly on cake and top with remainder whipped cream.
2. Layer next layer of cake, and spread the mango mousse over the layer and finally layer with final layer of cake. With a cake spread, remove access mousse and whipped cream. Chill cake in the refrigerator for about 2 hours to allow mousse and whipped cream to set before frosting. Thaw before serving.
xx
Labels:
baking recipe,
cake recipe,
chic and gorgeous,
chic gorgeous,
mango cake,
mango mousse,
mango mousse cake,
recipe
Monday, June 20, 2011
Baking Recipe: For Dad (Moist Dark Chocolate Cake with Chocolate Buttercream)
| This is what was left of the cake.. |
1. To blog and share with you tested recipes [didn't I say that earlier?LOLs]
2. To share with you the joy of indulgence
3. Most importantly; is seeing my dad who enjoys what I baked for him and hearing all the sweet sweet compliments.
If you're a chocolate lover, then you will love this recipe. I love this chocolate cake recipe to bits. It's my trusty companion. Apart from the Hershey's Perfect Chocolate Cake recipe. Here's also another cake which I baked a couple months back using Martha's recipe. If you like creme de menthe buttercream with dark chocolate cake recipe, check out my Mr Persnickety Cake .
Whenever I'm craving for a chocolate cake, I either use Martha's or Hershey's recipe. Trust me, they will not fail you. To sum up, the recipe will give you a lusciously dark, moist, aromatic, melt in the mouth chocolate cake.
Recipe:
For the cake
adapted from Martha's Living Magazine
3/4 cup unsweetened cocoa powder (for my own cake, I used 3/4 dark cocoa powder + 3/4 dutch cocoa powder)
1 1/2 cups cake flour/ all purpose flour
1 1/2 cups sugar
1 1/2 tsp baking soda
3/4 tsp baking powder
3/4 tsp salt
2 large eggs, lightly beaten
3/4 cup warm water
1/2 cup whole milk
1/4 cup sour cream (since I had buttermilk, I substituted with butter milk)
1/3 cup unsalted butter, melted
3/4 tsp pure vanilla extract (for my own, I used approx. 2-3 tsp of vanilla extract)
To prepare dark moist chocolate cake:
1. Preheat over to 350 deg or approx 180 Celsius. Butter or use Wilton's cake release to coat an 8-by-12-inch cake pan. Line bottom with parchment.
2. Lightly whisk using a hand whisk to combine cocoa powder, flour, sugar, baking soda, baking powder, and salt in a large bowl. Then transfer to your stand mixer's mixing bowl. With a paddle attachment, mix in eggs, warm water, milk, sour cream or buttermilk, butter and vanilla extract. Keep mixing with medium speed until batter is smooth with no lumps.
3. Pour batter into prepared pan. Bake for approx. 35-40 minutes or a tester inserted into the center comes out clean. Let cake cool for a bit before transferring onto a wire rack to complete cooling.
For the frosting:
6 ounces semi-sweet chocolate, chopped (or replace it with chocolate chips or buttons)
3/4 cup heavy cream
1 tbsp unsalted butter, room temperature
3/4 stick unsalted butter
1/3 stick salted butter
4 tbsp vegetable shortening
6-7 tbsp powdered sugar
1/2 -1 tsp pure vanilla extract
To prepare frosting:
1. Place chopped chocolate, chocolate chips or buttons in a medium sized bowl. Heat the cream and butter in a small saucepan over medium heat. Bring just to a boil.
2. Immediately pour cream over the chocolate and allow to stand for 5 minutes. Stir until smooth. Let the ganache sit at room temperature until slightly firm (approx. 1 hour). With a whisk, whisk and beat the ganache until creamy smooth, light and stiff. Set a side.
3. Attach the paddle attachment of a stand mixer. Beat salted and unsalted butter together with vegetable shortening until light and fluffy. Add in the powdered sugar and continue to mix until well combined.
4. Fold in vanilla extract; and with a rubber spatula fold in whipped chocolate frosting into butter cream mixture. Gently fold and mix until combine. Place cream in refrigerator for about 10-15 minutes to set before spreading over the cake, if chocolate butter cream is too soft.
xx
Thursday, June 16, 2011
Currently Coveting
1. Bake: From Cookies to Casseroles, Fresh from the Oven by Rachel Allen
2. The Hummingbird Bakery Cookbook
3. Nigella Kitchen: Recipes from the Heart of the Home by Nigella Lawson
4. Peggy's Favourite Cakes & Cookies by Peggy Porschen
5. Mad About Macarons!: Make Macarons Like the French by Jill Colonna
6. The Perfect Scoop: Ice Creams, Sorbets, Granitas, and Sweet Accompaniments by David Lebovitz
7. The Whoopie Pie Book by Claire Ptak
8. Barefoot Contessa at Home: Everyday Recipes You'll Make Over and Over Again by Ina Garten
Isn't there at times you just wish you could grab your hands on the items you desire? Be it a great dress, or chic table ware, baking utensils to cook books? Or even a place you would like to visit perhaps; to experience all the culinary culture and adventure?
I realised that I've always been secretly wishing tons of things, and right now I will gather my wishlisht and share them with you. So here's what I'm currently coveting on, and just maybe I might get one or couple of them soon..
xx
Labels:
baking books,
chic and gorgeous,
chic gorgeous,
cooking books,
currently coveting,
recipe books,
wishlist
Wednesday, June 15, 2011
Baking Recipe: Robin's Egg Blue Wedding (White Chocolate Chip Butter Cake + Vanilla Orange Buttercream)
Don't you just love the colour blue? And I mean not any colour blue.. to be specific Robin's Egg Blue. I really love this colour and found it to be rather calm, relaxing and adds some vintage flare.
Before it slip off my mind, to digress.. Lisa from Sweet As Sugar Cookies have invited me to join in the Treats Party. I've linked up 2 desserts of mine (Creamy Lemon Cheesecake and Scrumptious Strawberry Tarts). So go check out Lisa's website too if you love to get a sugar rush like I do.
Okay, now back to where I left off.. Over the weekend, I had a tiny project. Originally was to bake a 2 tier wedding cake, but I decided to make it a small 6 inches single tier cake with other tiny cuppies. Have not made those little ones in a while now.
To be honest, I really had no idea on how to decorate. I sketched so many designs and at the end of the day, I didn't even stick to what I drew, typical of me...LOLs. Instead, I decided that the cake has to be rustic and full shabby chic-ness. No clue what to call the cake yet, but I thought "Robin's Egg Blue" sounds catchy. What do you think?
At the end, the designs were impromptu, and if you love a good white butter cake, read on for recipe. Enjoy!
1/4 teaspoon salt
1/2 cup unsalted butter, at room temperature
1 cup caster sugar, divided
1-2 teaspoon pure vanilla extract
1/2 cup milk
1/8 teaspoon cream of tartar
1/2 cup semi dark chocolate chips (optional)
To prepare white butter cake:
1. Preheat oven at 350 degrees approx 177-180 Celsius. Grease 2 6-inches round cake pan and line with parchment paper. With a whisk and clean mixing bowl, whisk egg whites until foamy. Then add in cream of tartar and 1/4 cup sugar and continue to whisk until stiff peaks forms. Transfer to another bowl, if you do not have a spare mixing bowl.
2. In a separate bowl, mix cake flour, salt, and baking flour together. Next, change to a paddle attachment, beat butter and remainder of 3/4 cup sugar at medium speed until light, creamy and fluffy.
3. Add egg yolks, one at a time, beating after each addition. Scrape down the sides of the bowl. Add the vanilla extract and beat until combined. Divide cake flour mixture to 3 additions, starting with milk and ending with flour and continue mixing until well combined.
4. With a rubber spatula, gently fold in beaten egg whites into cake batter, and fold until well combine. Toss in chocolate chips (optional) and careful to not over mix and lose all the air. Otherwise cake will deflate.
5. Bake for 25-30 minutes or until a skewer or toothpick inserted comes out clean. Set aside to cool before transferring to a wire rack to cool off completely.
For vanilla butter cream with hint of orange flavour
4-5 tbsp of orange juice (freshly squeeze)
3-4 cups of icing sugar (or just enough for taste of frosting consistency)
1 1/2 stick of unsalted butter
1/2 stick salted butter
2 tsp of vanilla extract
1 cup milk
5 tbsp all purpose flour
To prepare orange vanilla butter cream:
1. With a paddle attachment, whisk butter until light, fluffy and creamy.
2. Add in icing sugar a little at a time, as you may not need 4 cups of icing sugar.
3. Turn speed down to slow to add in orange juice and vanilla extract. Then turn the speed up again and continue to whisk until frosting double in volume, as it'll be light and fluffy.
4. In a saucepan, heat up milk but not to boiling point. Let cool slightly, then toss in flour all at once and stir vigorously, until milk and flour is incorporated. You will notice that the liquid will thicken up and return to stove and let mixture simmer, while continue stirring.
5. Once liquid is thicker, let cool for a couple of minute. With a sieve, press the thicken liquid through into the butter cream. Discard the lumps. Turn the mixer back up and whisk the butter cream for the last time for 2-3 minutes until well incorporated.
xx
Before it slip off my mind, to digress.. Lisa from Sweet As Sugar Cookies have invited me to join in the Treats Party. I've linked up 2 desserts of mine (Creamy Lemon Cheesecake and Scrumptious Strawberry Tarts). So go check out Lisa's website too if you love to get a sugar rush like I do.
Okay, now back to where I left off.. Over the weekend, I had a tiny project. Originally was to bake a 2 tier wedding cake, but I decided to make it a small 6 inches single tier cake with other tiny cuppies. Have not made those little ones in a while now.
To be honest, I really had no idea on how to decorate. I sketched so many designs and at the end of the day, I didn't even stick to what I drew, typical of me...LOLs. Instead, I decided that the cake has to be rustic and full shabby chic-ness. No clue what to call the cake yet, but I thought "Robin's Egg Blue" sounds catchy. What do you think?
At the end, the designs were impromptu, and if you love a good white butter cake, read on for recipe. Enjoy!
Recipe
For white butter cake
adapted from Joy of Baking
2 large eggs, separated
1 3/4 cups sifted cake flour
2 teaspoons baking powder1/4 teaspoon salt
1/2 cup unsalted butter, at room temperature
1 cup caster sugar, divided
1-2 teaspoon pure vanilla extract
1/2 cup milk
1/8 teaspoon cream of tartar
1/2 cup semi dark chocolate chips (optional)
To prepare white butter cake:
1. Preheat oven at 350 degrees approx 177-180 Celsius. Grease 2 6-inches round cake pan and line with parchment paper. With a whisk and clean mixing bowl, whisk egg whites until foamy. Then add in cream of tartar and 1/4 cup sugar and continue to whisk until stiff peaks forms. Transfer to another bowl, if you do not have a spare mixing bowl.
2. In a separate bowl, mix cake flour, salt, and baking flour together. Next, change to a paddle attachment, beat butter and remainder of 3/4 cup sugar at medium speed until light, creamy and fluffy.
3. Add egg yolks, one at a time, beating after each addition. Scrape down the sides of the bowl. Add the vanilla extract and beat until combined. Divide cake flour mixture to 3 additions, starting with milk and ending with flour and continue mixing until well combined.
4. With a rubber spatula, gently fold in beaten egg whites into cake batter, and fold until well combine. Toss in chocolate chips (optional) and careful to not over mix and lose all the air. Otherwise cake will deflate.
5. Bake for 25-30 minutes or until a skewer or toothpick inserted comes out clean. Set aside to cool before transferring to a wire rack to cool off completely.
For vanilla butter cream with hint of orange flavour
4-5 tbsp of orange juice (freshly squeeze)
3-4 cups of icing sugar (or just enough for taste of frosting consistency)
1 1/2 stick of unsalted butter
1/2 stick salted butter
2 tsp of vanilla extract
1 cup milk
5 tbsp all purpose flour
To prepare orange vanilla butter cream:
1. With a paddle attachment, whisk butter until light, fluffy and creamy.
2. Add in icing sugar a little at a time, as you may not need 4 cups of icing sugar.
3. Turn speed down to slow to add in orange juice and vanilla extract. Then turn the speed up again and continue to whisk until frosting double in volume, as it'll be light and fluffy.
4. In a saucepan, heat up milk but not to boiling point. Let cool slightly, then toss in flour all at once and stir vigorously, until milk and flour is incorporated. You will notice that the liquid will thicken up and return to stove and let mixture simmer, while continue stirring.
5. Once liquid is thicker, let cool for a couple of minute. With a sieve, press the thicken liquid through into the butter cream. Discard the lumps. Turn the mixer back up and whisk the butter cream for the last time for 2-3 minutes until well incorporated.
xx
Tuesday, May 31, 2011
Baking Recipe: Scrumptious Strawberry Tart
This is my very first time having my hands on making Strawberry Tarts. These little decadent tarts are one of my absolute favourite treats, apart from lemon meringue tart. Whenever I travel, I will constantly hunt down a local bakery or dessert shop to sample their tarts. And so far, they have done justice. Hopefully mine taste like summer too.. with loads of heart and love put into it ;).
Note: In my case, I couldn't locate my tart pan so I've decided to make smaller individual tarts using my muffin pan. The recipe below yields approximately 6-8 tarts, depending on the thickness of the shell.
Recipe
For the Crust/ Tart shell
adapted from Martha Stewart
1 1/4 cups all purpose flour, sifted
1/2 cup or 1 stick unsalted butter, cut into small cubes
1/3 cup sugar
1/4 tsp salt
1/2-1 tsp vanilla extract (optional)
To prepare crust/tart shell:
1. Preheat oven to 350 degrees. In a food processor, blend flour, butter, 1/3 cup sugar and salt until moist crumbs form (this may take up to approx1-2 minutes).
2. Make sure to lightly grease pan with butter and sprinkle flour over the pan.
3. Transfer dough to a 9-inch round tart pan with a removable bottom or muffin pan.
4. With floured fingers, press dough evenly into pan and up sides. Dip a dry measuring cup in flour, and use it to press dough firmly into bottom and against sides of pan. Freeze crust until firm for about 10-15 minutes.
5. Using a form, prick crust all over. Bake until golden, 25-30 minutes, pressing down gently once or twice with a spoon during baking if crust puffs up. Let cool completely in pan before transferring on to wire rack, cake stand or platter.
For the Filling
*If using 9 inches tart pan
1 bar (8 ounces) philly cream cheese, softened
1/4 cup powdered or icing sugar
1-2 tsp vanilla extract
1-2 tbsp lemon juice
1/2 cup whipping cream
1 1/2 to 2 pounds strawberries, hulled and halved
1/4 cup seedless red current jelly
**If using muffin pan
1/2 bar philly cream cheese, softened
1/2 cup whipping cream
4-6 tbsp powdered or icing sugar
3-4 tsp lemon juice
1/2 -1 tsp vanilla extract
15-16 strawberries, hulled
1/3 cup seedless red current jelly
To prepare filling:
1. With a whisk, whipped whipping cream until soft peak/ stiff consistency. Becareful to not over whip. Transfer to another bowl.
2. Using the same mixing bowl and now with a paddle attachment, mix cream cheese and icing sugar until well combined. Then add in lemon juice a teaspoon at a time and continue to mix and then fold in vanilla extract.
3. With a spatula, fold in half of the whipped cream to cream cheese mix until well combine and then fold in the rest of whipped cream. Gently fold the whipped cream making sure to not let it turn into liquid form.
To assemble strawberry tart:
1. You can choose to glaze the bottom of tart with melted dark/ milk chocolate. Melt chocolate chips with 2-3 teaspoons of milk in a microwave for about 35 seconds making sure to stir and not burn the chocolate. I glazed my tart with melted chocolate to prevent the filling to sip through the tart, making the shell soggy.
2. If you do glaze the bottom of tart, pop the tart shells back in the refridgerator for about 10-15 minutes or until glaze is set.
3. Spoon the filling into the tart shell, and top it with 3 whole and hulled strawberries to each tart.
4. In a small saucepan, heat jelly on medium low until liquefied or heat it in a microwave for 1 minute. Gently brush strawberries with jelly, let set at least 20 minutes. Thaw before serving, if tarts were chilled.
xx
Note: In my case, I couldn't locate my tart pan so I've decided to make smaller individual tarts using my muffin pan. The recipe below yields approximately 6-8 tarts, depending on the thickness of the shell.
Recipe
For the Crust/ Tart shell
adapted from Martha Stewart
1 1/4 cups all purpose flour, sifted
1/2 cup or 1 stick unsalted butter, cut into small cubes
1/3 cup sugar
1/4 tsp salt
1/2-1 tsp vanilla extract (optional)
To prepare crust/tart shell:
1. Preheat oven to 350 degrees. In a food processor, blend flour, butter, 1/3 cup sugar and salt until moist crumbs form (this may take up to approx1-2 minutes).
2. Make sure to lightly grease pan with butter and sprinkle flour over the pan.
3. Transfer dough to a 9-inch round tart pan with a removable bottom or muffin pan.
4. With floured fingers, press dough evenly into pan and up sides. Dip a dry measuring cup in flour, and use it to press dough firmly into bottom and against sides of pan. Freeze crust until firm for about 10-15 minutes.
5. Using a form, prick crust all over. Bake until golden, 25-30 minutes, pressing down gently once or twice with a spoon during baking if crust puffs up. Let cool completely in pan before transferring on to wire rack, cake stand or platter.
For the Filling
*If using 9 inches tart pan
1 bar (8 ounces) philly cream cheese, softened
1/4 cup powdered or icing sugar
1-2 tsp vanilla extract
1-2 tbsp lemon juice
1/2 cup whipping cream
1 1/2 to 2 pounds strawberries, hulled and halved
1/4 cup seedless red current jelly
**If using muffin pan
1/2 bar philly cream cheese, softened
1/2 cup whipping cream
4-6 tbsp powdered or icing sugar
3-4 tsp lemon juice
1/2 -1 tsp vanilla extract
15-16 strawberries, hulled
1/3 cup seedless red current jelly
To prepare filling:
1. With a whisk, whipped whipping cream until soft peak/ stiff consistency. Becareful to not over whip. Transfer to another bowl.
2. Using the same mixing bowl and now with a paddle attachment, mix cream cheese and icing sugar until well combined. Then add in lemon juice a teaspoon at a time and continue to mix and then fold in vanilla extract.
3. With a spatula, fold in half of the whipped cream to cream cheese mix until well combine and then fold in the rest of whipped cream. Gently fold the whipped cream making sure to not let it turn into liquid form.
To assemble strawberry tart:
1. You can choose to glaze the bottom of tart with melted dark/ milk chocolate. Melt chocolate chips with 2-3 teaspoons of milk in a microwave for about 35 seconds making sure to stir and not burn the chocolate. I glazed my tart with melted chocolate to prevent the filling to sip through the tart, making the shell soggy.
2. If you do glaze the bottom of tart, pop the tart shells back in the refridgerator for about 10-15 minutes or until glaze is set.
3. Spoon the filling into the tart shell, and top it with 3 whole and hulled strawberries to each tart.
4. In a small saucepan, heat jelly on medium low until liquefied or heat it in a microwave for 1 minute. Gently brush strawberries with jelly, let set at least 20 minutes. Thaw before serving, if tarts were chilled.
xx
Wednesday, May 25, 2011
Baking Recipe: LadyBug Cake
I don't think there's a LadyBug cake out there. Or is there? Have you come across any? I must say, this cake is a random cake recipe whereby I mesh a couple of flavours together; which in my opinion works out quite well. There were a couple of cake recipe I learnt by browsing through recipe books or other foodie blogs. So I thought why not I challenge myself to bake a cake with my own mesh up of recipe, lol..
In a nutshell, this cake resembles a slight base of an Opera Cake. The cake is an almond sponge cake (joconde) but instead of coffee cream, it has been replaced with vanilla bean cream and in between is sandwich with a decadent raspberry-strawberry jelly between layers. This adds a pop of colour to the cake.
Try it out when you have got lots of time in your hands and tell me what you think. Enjoy~
Recipe:
For the almond sponge cake
adapted from Chef Jean Francois Arnaud
100g finely ground almond
55g icing sugar
30g all purpose flour/ cake flour
3 egg whites (keep the yolks)
65g caster sugar
3 whole eggs
20g butter, melted
1/2 -1 tsp vanilla extract
To prepare almond sponge:
1. Preheat oven to 220 Celsius. Line an 8 inches round baking dish with parchment paper and coat the sides with Wilton cake release or butter.
2. Sift together ground almond, icing sugar and flour.
3. Whisk the egg whites in the stand mixer until it sets in foamy soft peaks.
4. Add caster sugar a spoon at a time and continue to whisk for a few more seconds.
5. Next, add whole eggs and mix them well.
6. Fold in the almond and flour mixture into the egg mixture. To that add in the melted butter and mix until mixture is smooth. Pour onto the baking dish and bake for about 8-10 minutes or until a tooth pick inserted comes out clean. Transfer cake to a wire rack and let it cool completely before refrigerating the cake.
For the raspberry-strawberry layers:
adapted from Tartelette Blog
2 tbsp powdered gelatin
1/4 cup cold water
2 cups frozen raspberries
2 cups frozen strawberries
1/2 cup sugar
To prepare raspberry-strawberry layers:
1. Line a shallow round dish, about (7-8 inches) with parchment paper.
2.Sprinkle the gelatin over the cold water and reserve.
3. In a large saucepan set over medium low heat, bring the raspberries, strawberries and sugar to a simmer and cook until the berries are completely thawed and reduced to a puree (smash them down with a spoon if necessary) and the sugar is dissolved.
4.Remove from the heat and add the gelatin, stirring until it completely dissolved in the raspberries. Pour over the prepared shallow dish. Let cool to room temperature and then freeze until firm.
For the vanilla bean cream:
250ml/ 1 cup whole milk
1 vanilla pod
6 egg yolks (used 3 from the remaining egg whites)
180g/ 3/4 cups caster sugar
350g butter/ approx. 11/4 cup, softened
To prepare vanilla bean cream:
1. Combine milk and vanilla pod in a small saucepan and bring to a boil.
2. In a mixing bowl, whisk egg yolks and sugar until pale.
3. Strain the vanilla milk mixture and gently pour into the yolk mixture while whisking. Make sure to not pour directly over the whisk, and pour down the sides of mixing bowl, to avoid having scramble eggs. Mix well and pour the mixture back into a saucepan.
4. Cook under medium heat, stirring constantly until it thickens. A tip, you could actually feel the spatula getting slightly heavier.
5. Strain immediately into a flat tray and allow to cool to room temperature.
6. With a paddle attachment, pour the mixture into a stand mixer and at medium speed, beat in the butter, 1 cube at a time. At first the mixture will still be diluted, however, don't worry, continue to add in the butter and you will notice the mixture will slowly turn into cream consistency. Once thicken, whisk it as high speed for a couple of seconds and now your cream is ready. It should be smooth, thick and light with no lumps.
For chocolate glaze:
adapted from Chef Jean Francois Arnaud
100g dark chocolate, melted
120g UHT cream
180g caster sugar
145ml water
60g cocoa powder
11g gelatin powder, softened in 50ml water
To prepare chocolate glaze:
1. Soak gelatin in room temperature water/ cold water is fine.
2. Boil the cream, sugar and water in a small saucepan. Add in the cocoa powder. Whisk for 2 mins on the heat and add the soaked gelatin; stir until dissolve. Remove from heat, cooling it at room temperature, and then transfer to the refrigerator.
To assemble cake:
1. Remove almond sponge from the refrigerator. Peel off parchment paper and with a serrated knife, slice the cake carefully and thinly into 3 layers.
2. Spread the bottom sponge layer with vanilla bean cream and then top with second layer of sponge, and spread another layer of vanilla bean cream.
3. Meanwhile, remove the raspberry-strawberry jelly and place it over the vanilla bean cream which was spread on second layer of sponge. Top with the third sponge layer and spread cover the whole cake with vanilla bean cream.
4. Melt the chocolate glaze in microwave oven on defrost setting for just a couple of minutes (approx 2-3mins, be careful not to let chocolate burn) and pour over the cake. Chill in the refrigerator to let glaze set and thaw before serving.
xx
In a nutshell, this cake resembles a slight base of an Opera Cake. The cake is an almond sponge cake (joconde) but instead of coffee cream, it has been replaced with vanilla bean cream and in between is sandwich with a decadent raspberry-strawberry jelly between layers. This adds a pop of colour to the cake.
Try it out when you have got lots of time in your hands and tell me what you think. Enjoy~
Recipe:
For the almond sponge cake
adapted from Chef Jean Francois Arnaud
100g finely ground almond
55g icing sugar
30g all purpose flour/ cake flour
3 egg whites (keep the yolks)
65g caster sugar
3 whole eggs
20g butter, melted
1/2 -1 tsp vanilla extract
To prepare almond sponge:
1. Preheat oven to 220 Celsius. Line an 8 inches round baking dish with parchment paper and coat the sides with Wilton cake release or butter.
2. Sift together ground almond, icing sugar and flour.
3. Whisk the egg whites in the stand mixer until it sets in foamy soft peaks.
4. Add caster sugar a spoon at a time and continue to whisk for a few more seconds.
5. Next, add whole eggs and mix them well.
6. Fold in the almond and flour mixture into the egg mixture. To that add in the melted butter and mix until mixture is smooth. Pour onto the baking dish and bake for about 8-10 minutes or until a tooth pick inserted comes out clean. Transfer cake to a wire rack and let it cool completely before refrigerating the cake.
For the raspberry-strawberry layers:
adapted from Tartelette Blog
2 tbsp powdered gelatin
1/4 cup cold water
2 cups frozen raspberries
2 cups frozen strawberries
1/2 cup sugar
To prepare raspberry-strawberry layers:
1. Line a shallow round dish, about (7-8 inches) with parchment paper.
2.Sprinkle the gelatin over the cold water and reserve.
3. In a large saucepan set over medium low heat, bring the raspberries, strawberries and sugar to a simmer and cook until the berries are completely thawed and reduced to a puree (smash them down with a spoon if necessary) and the sugar is dissolved.
4.Remove from the heat and add the gelatin, stirring until it completely dissolved in the raspberries. Pour over the prepared shallow dish. Let cool to room temperature and then freeze until firm.
For the vanilla bean cream:
250ml/ 1 cup whole milk
1 vanilla pod
6 egg yolks (used 3 from the remaining egg whites)
180g/ 3/4 cups caster sugar
350g butter/ approx. 11/4 cup, softened
To prepare vanilla bean cream:
1. Combine milk and vanilla pod in a small saucepan and bring to a boil.
2. In a mixing bowl, whisk egg yolks and sugar until pale.
3. Strain the vanilla milk mixture and gently pour into the yolk mixture while whisking. Make sure to not pour directly over the whisk, and pour down the sides of mixing bowl, to avoid having scramble eggs. Mix well and pour the mixture back into a saucepan.
4. Cook under medium heat, stirring constantly until it thickens. A tip, you could actually feel the spatula getting slightly heavier.
5. Strain immediately into a flat tray and allow to cool to room temperature.
6. With a paddle attachment, pour the mixture into a stand mixer and at medium speed, beat in the butter, 1 cube at a time. At first the mixture will still be diluted, however, don't worry, continue to add in the butter and you will notice the mixture will slowly turn into cream consistency. Once thicken, whisk it as high speed for a couple of seconds and now your cream is ready. It should be smooth, thick and light with no lumps.
For chocolate glaze:
adapted from Chef Jean Francois Arnaud
100g dark chocolate, melted
120g UHT cream
180g caster sugar
145ml water
60g cocoa powder
11g gelatin powder, softened in 50ml water
To prepare chocolate glaze:
1. Soak gelatin in room temperature water/ cold water is fine.
2. Boil the cream, sugar and water in a small saucepan. Add in the cocoa powder. Whisk for 2 mins on the heat and add the soaked gelatin; stir until dissolve. Remove from heat, cooling it at room temperature, and then transfer to the refrigerator.
To assemble cake:
1. Remove almond sponge from the refrigerator. Peel off parchment paper and with a serrated knife, slice the cake carefully and thinly into 3 layers.
2. Spread the bottom sponge layer with vanilla bean cream and then top with second layer of sponge, and spread another layer of vanilla bean cream.
3. Meanwhile, remove the raspberry-strawberry jelly and place it over the vanilla bean cream which was spread on second layer of sponge. Top with the third sponge layer and spread cover the whole cake with vanilla bean cream.
4. Melt the chocolate glaze in microwave oven on defrost setting for just a couple of minutes (approx 2-3mins, be careful not to let chocolate burn) and pour over the cake. Chill in the refrigerator to let glaze set and thaw before serving.
xx
Friday, May 20, 2011
Baking Recipe: Mr Persnickety (mint buttercream chocolate cake)
Have you heard of Mr Men and Little Miss? I've always love these characters. They are just so cute and funny. My brother's birthday was back in March, and I thought to celebrate his day, I will bake him a cake. He loves to eat what I whip up or bake and has always been very supportive by giving me positive comments.
Since I've always spoilt my brother, it took me a while to piece the cake together. I'm from a family who LOVES chocolate cake expect for my dad who's the acceptional one. He's a cheese cake lover. Since it's not my dad's party, obviously, I will make a rich and moist dark chocolate cake. The hard part was decorating the cake. It took me awhile but I recalled there's a character which fits my little brother really well,
Mr Persnickety. You'll see why later that this cake fits him.
This time round, instead of my Hershey's chocolate cake recipe, I decided to try out Martha Stewart's recipe which was published in her Living magazine, January 2009 her no# 182 edition.
Note: Now the recipe below is the original amount that is called for. For my cake, I've doubled up all the amount to make an 8-inches, 4 layer cake. This also includes the frosting. Otherwise Martha's recipe is ideal for just a single layer cake, or if you're an expert carver who can carve thinly in between layer, I will say 'kudos to you mate!'
Recipe:
For the cake
3/4 cup unsweetened cocoa powder (for my own cake, I used 3/4 dark cocoa powder + 3/4 dutch cocoa powder)
1 1/2 cups cake flour/ all purpose flour
1 1/2 cups sugar
1 1/2 tsp baking soda
3/4 tsp baking powder
3/4 tsp salt
2 large eggs, lightly beaten
3/4 cup warm water
1/2 cup whole milk
1/4 cup sour cream (since I had buttermilk, I substituted with butter milk)
1/3 cup unsalted butter, melted
3/4 tsp pure vanilla extract (for my own, I used approx. 2-3 tsp of vanilla extract)
To prepare dark moist chocolate cake:
1. Preheat over to 350 deg or approx 180 Celsius. Butter or use Wilton's cake release to coat an 8-by-12-inch cake pan. Line bottom with parchment.
2. Lightly whisk using a hand whisk to combine cocoa powder, flour, sugar, baking soda, baking powder, and salt in a large bowl. Then transfer to your stand mixer's mixing bowl. With a paddle attachment, mix in eggs, warm water, milk, sour cream or buttermilk, butter and vanilla extract. Keep mixing with medium speed until batter is smooth with no lumps.
3. Pour batter into prepared pan. Bake for approx. 35-40 minutes or a tester inserted into the center comes out clean. Let cake cool for a bit before transferring onto a wire rack to complete cooling.
Note: Cake will keep up to a week, if unfrosted.
For the frosting:
2 large white eggs
1/2 cup sugar
1 1/2 sticks unsalted butter, softened and cut into cubes
2 1/2 tbsp creme de menthe/ mint extract (go easy on the mint extract and taste along as you go until you reach your desired flavour)
1 tsp pure vanilla extract
1-2 drops of green food colouring (optional)
Note: To decorate, you can always opt for chocolate sprinkles, white sprinkles, Andes Creme de Menthe candies, After8 thin chocolates etc.
To prepare creme de menthe frosting:
1. Mix whites and sugar in a mixer bowl set over a pan of simmering water. Heat, whisking constantly until sugar dissolves for approx. 2-3 mins and mixture is warm.
2. Remove from heat. With a whisk attachment, whisk on high speed until stiff peaks form, for about 5 minutes. Add butter, several cubes at a time, whisking after each addition. Add creme de menthe, vanilla and food colouring, then beat for another 2 minutes, scrapping down sides of bowl when needed.
Enjoy!
xx
Subscribe to:
Posts (Atom)