Saturday, July 30, 2011

Dessert Recipe: Bon Anniversaire ChicGorgeous & Kiwi-Orange Creamsicles


Woo hoo.. for she's a jolly good fellow.. for she's a jolly good fellow.. for she's a jolly good fellow..[ya da..la la..di..da!] Chic & Gorgeous Treats is now 1 years old. Wow.. has it been a year? Time is really flying. I keep saying this every single day. It just feel like the earth clock has speed up the time. Don't you?

It has been a lot of ups and down plus a couple of months I went MIA. It's because I was just tired and lost some of my motivation to up keep the blog. However, many thanks to my loyal blogger friends and personal friends for poking me left and right making sure I don't give up. That is something I value at heart and treasure most. So here's a shout out to Elisabeth from Food and Thrift Finds and Pei Li from Pei Li Miniatures, THANK YOU for constantly stopping by to check on me. As for new foodie friends, I'm glad that I've found you and in return that you've spread the word about me or stumble upon me. For once I know you guys and gals are reading and that made me want to write even more, sharing my views on tested recipes.

Now this post is deeply inspired by Stephanie from Desserts for Breakfast. I remembered sometime ago, I tagged Stephanie and she gave me a shout out at her blog too. I may not know her personally, but boy oh! boy her dessert making and photography skills is to die for, if I say so. I thought it would be fun to celebrate my blog anniversary with a twist. Instead of a cake or tart, I think it's more fun to serve creamsicles or ice lollies or ice cream in a matter of fact. For recipe click here as I think it's only rightful of me to link it back to Stephanie from Desserts for Breakfast. When I saw that orange and kiwi is involved, I knew I just had to make them as orange is my no.1 favourite juice and kiwi is packed with vitamins. Put them together, I bet we can conquer cough an cold anytime. And what can I say further? A PERFECT Summer treat. The balance of vanilla cream, kiwi and orange is refreshing, light and will sure have you asking for more.

I think I'm going to take a break now and enjoy licking my Kiwi-Orange Creamsicles! Yummmm.. YummmMMmm.

P/S: Do stay tune for the new Chic & Gorgeous Treats and I'm truly happy that I now have 30 followers. To the 30th follower, you made it happen too and I hope there will be more followers to come. So keep them coming and I will certainly do my best to write more interesting food topics ;)!!

xx

Tuesday, July 26, 2011

Baking Recipe: Peanut Butter & Jelly Doughnuts


It's now doughnut time.. What could be screaming in my head? Peanut Butter and Jelly of course. This was also another staple breakfast I had as a child. Looks like this week's gonna be a lot about dough huh? Yes.. I admit.. I really am addicted in kneading dough right now. Well of course we can always use the Kitchen Aid dough hook. But then... I don't know why I like giving myself more work. I do it manually.. Yup.. you got that right. I mix the batter with a wooden spoon etc. Bottom line, I really do enjoy getting my hands dirty.. doing all the work. It's sticky but at the end, you really get a soft, elastic and smooth dough. The feeling is FANTASTIC. Do try it some time to release some stress if needed ;).

This time round, the recipe is adapted from another fellow blogger who's also on FoodBuzz [drumrolls..] Recipe's from Lindsey at Gingerbread Bagels. How cute is that? In fact this was part of the Daring Baker's Challenge. Double fun!! I took on the challenge myself since I'm not part of the group. I cannot believe my eyes that I'm making doughnuts. I'm evolving.. Yeayyy!!

Okay, I think I wouldn't paste the recipe here, and would like to link it to Lindsey's blog instead. So for recipe, click here. However, I will not leave you empty handed, and would like to share a couple of tips or what I thought about the recipe.

Here goes ;):

  • Recipe yields slightly more than 2 dozens of small-medium size doughnuts. Refer photos above. I'm not a big fan of large treats, and that could probably explain why I always get more out of what the recipe calls for.
  • I made 20 medium doughnuts, and the remainder is a surprise. Will share with you more on that later on.
  • If using a wooden spoon to mix flour and yeast, that requires a little arm strength. Persevere, as you just need to make sure the mixture combines together. Flour your work surface and hands with adequate flour. Knead the dough for about 5-10 minutes [usually close to 10 minutes] or until when is no longer sticky but elastic and smooth to touch. Work with a timer if that helps as I find that useful.
  • Make sure to always cover dough with damp cloth or I prefer a cling film wrapped tightly around the bowl and rest dough according to suggested time to allow it to rise.
  • If you do not have a cooking termometer, and not sure if oil is hot enough? Take a tiny rolled dough and drop it into the oil. If it sizzles and floats up, your oil is ready to go.
  • While frying the doughnuts, if you notice they are burning faster, turn down the heat. Then turn it back up if it cools down too much. I suggest fry 1 at a time. This way you can control how golden the doughnut turns out. Also it gives you enough room to take out the doughnut if it starts burning.
  • Taste your peanut butter filling. I don't really like my treats overly sweet, so I always keep it to a minimal amount of powdered sugar as suggested. Use a small knife to make a small hole in the doughnut, piping bag and a regular Wilton tip to pipe filling. Clean off excess filling so it does not spill out.
At the end, you will get a light crispy soft chewy doughnut [YummmmMmm..]. Enjoy!!

xx


Monday, July 25, 2011

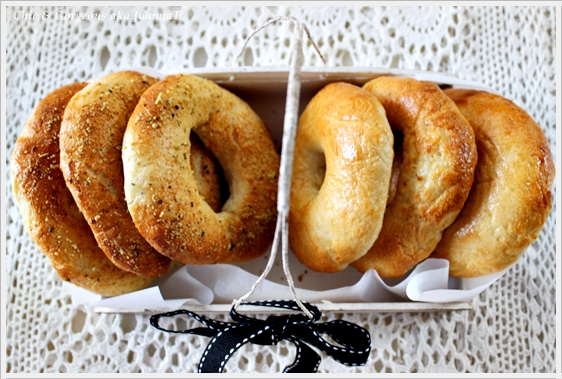
Baking Recipe: Tana Ramsay's Home-made Bagels


Tana Ramsay's Real Family Food cookbook, wife of the toughie Chef Gordon Ramsay. In my opinion, he swears too much and that's quite a turn off. However, I'm sure he's a reliable chef. Now this book is more on home cook meals. Really ideal for singles like me, family and friends as well as parents with young ones. There will be a recipe for everybody am sure.

As I'm drafting this post, my whole house is filled with the most intoxicating smell of bagels baking away in my oven. Gosh, you really have to try this.When I saw Tana's bagel recipe, I knew I had to try it out. Ever since I kneaded my pizza dough, I'm now more eager on kneading other form of breads. Having the bagel turn out perfect will be another sense of accomplishment.

Something to work on: Not make the hole in the middle of bagel bigger. I just had to even out the thickness of bagel and that made the hole bigger [sigh..]. Note to self on next time, just leave the bagel as it is . Should have listen to Tana's advise when she said and I quote after her " Resist perfection at this point or you'll go mad". I certainly can relate to that and am definitely going to make them again and make sure I improve my skill.

This is my first time trying out this bagel recipe. So if you have other true and tested recipe that you constantly turn too, feel free to share them here ;). The texture of bagel? Crunchy on the outside, soft and chewy on the inside. Lovely.. Nothing beats a freshly baked bread from the ovens of your home. Enjoy!

Recipe:
Adapted from Tana Ramsay's Real Family Food
yields 10 bagels

Note: I made 5 plain bagels with just egg washed and another 5 sprinkled with some mixed herbs and grated Parmesan.

For the bagel:

3 tbsp dry yeast
2 tbsp caster sugar
125ml warm water
250ml warm milk
450g plain flour/ all purpose flour, sifted
3 tsp salt
1 egg, lightly beaten

To prepare the bagel:

1. Put yeast, 1 tablespoon sugar, milk and water in a bowl. Lightly whisk the yeast until it's dissolved. Place a side at a warm place for about 10-15 minutes until it begins to form bubbles.

2. Next in a large mixing bowl, add flour. salt, and the remaining of sugar. Create a well and pour yeast mixture into flour. Using a wooden spoon or spatula, mix flour and yeast mixture until well combine.

3. Turn the dough out onto a floured surface and knead for another 5-10 minutes until it is smooth and elastic whereby dough will no longer stick to your fingers.

4. Place dough into a large bowl and cover with a damp tea towel and stand in a warm place for approximately 1 hour until it has doubled up in size. Be careful to not leave it for too long. Otherwise it will form a hard crust on the top which stops the dough from rising.

5. Flour the work surface and turn out the dough. Knead it for another 1-2 minute and divide into 10 equal balls.

6. Lay parchment paper on baking tray. Using your thumb, make a hole in the middle of each ball and massagee into a bagel shape. The hole in the centre should be approximately 2.5cm/1 inch in diameter and there should be equal thickness in the edges all around.

7. Place rolled bagels on baking tray and  cover with a damp tea towel and leave in a warm place for another 20 minutes to allow it to rise again.

8. Preheat oven to 190 Celsius or 375 Fahrenheit.

9. Bring a pot of water to a boil and lower bagels in batches into the water. Blanch them for about 1 minute, remove and place them back onto baking tray.

10. Brush top of bagel with some egg wash and sprinkle your desired seeds or herbs. Bake them for about 20-25 minutes or until they are golden brown in colour. Transfer to a cooling rack. Bagel is best consumed within 2 days. Preheat it back in the microwave and you're set to go with your breakfast or lunch. Enjoy!

xx

Saturday, July 23, 2011

Baking Recipe: Gerbera Daisy Cake (Dark Chocolate Cake with Light Mango Buttercream)


Gerbera Daisy cake? I think it's so pretty. Don't you? It is so pretty that I had to keep taking photos of this cake of mine [self gloating for one moment.. LOLS]. Gerbera daisy has always been one of my favourite flower. To me it has a sense of chic-ness and maybe adds some girly elements to it. Okay guys, I know this cake may not be macho enough but I dare say the flavour combination of the cake is good enough to make you melt over your knees.

I started out being really adventurous. I had this "smart" plan on decorating my cake, where I am going to melt chocolate etc.. Then the thought of washing up tons of utensils got me thinking again. Okay.. perhaps I was feeling a little lazy to frost the cream on my cake that I resulted by taking out out my piping bag and my trusty Wilton #104 tip and started piping like a manic person. However lazy I can be I am a person who's particular and every single thing I do has to be screaming perfection and just not mere perfection. It took me about 15-20 minutes or so and I was done! Now that's a time record breaking to me.

The cake is an ultra rich dark chocolate cake, where I 've used here, and here. This is a recipe I tested a couple of times and I assure you it has not fail me, other than just one time.. that one time I sort of miscalculated the amount of liquid. But hey.. who have not made a mistake in baking? All mistakes are forgivable. Just start again.. if time permits of course.

As for the frosting, it's a light, sweet and aromatic Mango Butter cream. You might think it's odd, but apparently it's not. There are quite a lot of dessert recipes out there where mango is paired with chocolate. So this is my own version of Mango Butter cream, as the challenge is to find a balance between the sweetness of mango flavour to merry the dark chocolate cake. Oh! as for the remainder cake which was sliced off since it gave me mountains on my cake, I thought it will be wasteful to throw them away. Instead, I made them into cake in a cup and paired it with some leftover Mango buttercream. Have a wonderful weekend. Enjoy!!


Recipe:

Note: Recipe for dark chocolate cake is not doubled in amount. That's the original ingredient measure. The recipe is perfect for a 6-inches, 4 layered round cake or 8-inches, 2 layered round cake or 10-inches, single layered square cake.

For ultra rich dark chocolate cake recipe, click here.

For mango butter cream:

Note: I made my own mango puree. Slice 2 mangoes, and process it in a food processor. No sugar required. Sieve it through a sieve and discard any lumps or fibre.

1 1/3 cup mango puree
2 cups powdered sugar, sifted
1 1/2 stick unsalted butter
1/2 cup vegetable shortening
1 tsp clear vanilla extract
2-3 tsp lemon juice

To prepare mango butter cream:

1. Using a stand mixer with the paddle attachment attached on medium speed, whip butter and vegetable shortening until light and fluffy.

2. Slow down the speed, then add 1/4 cup of powdered sugar at a time then followed by another 1/4 cup until it totals up to 2 cups.

3. Add in the mango puree, vanilla extract and lemon juice and continue to mix at medium speed until mixture is well combined.

4. Crank up the mixer back to high speed and whip for another minute or so until frosting is light and fluffy.

5. Chill frosting in the fridge for about 15 minutes and then it's ready to use.

xx

Friday, July 22, 2011

Cooking Recipe: Tangy Chili & Garlic Tiger Prawns Noodle


What's for dinner? Another spontaneous meal that I put together. I found some prawns, and french beans. And then an A-HA moment came along. I recalled reading Pierre's post on duck and scallop with yellow egg noodle and I thought .. "okay tonight's dinner will be significantly Chinese".

I decided that we are not having rice, so instead I will fry some prawns with chili, lime juice, lots of garlic, some shallots and pair it with a simple fried yellow egg noodle. There's a secret in the dish.. pssts.. come closer.. there's bacon. ;) LOLs..

The lime juice ties up the whole dish nicely. It has the perfect balance of heat, sourness and saltiness from bacon and natural sweetness from french beans, prawns and yellow egg noodle. Enjoy!!

Recipe
yields 4-6 pax
Note: To marinade prawns, I always use my mom's basic recipe and it goes well with just any meat and poultry. Add some light soy sauce, couple dashes of sesame oil, white pepper, shaoxing wine and couple teaspoon of cornstarch. If possible, marinade a couple hours ahead or even better, marinade overnight.

For the tangy chili prawns

200g tiger prawns, deveined
5 cloves garlic, diced or finely chopped
3 shallots, sliced finely
1 medium red chili, seeded and finely chopped
1 tbsp Dry sherry or Shaoxing rice wine
1 lime, juiced
75g french beans, chopped into 2 cm lengths
dried chili flakes
6-8 streaky bacon, sliced into cubes
2 tbsp vegetable/canola/peanut oil
salt and pepper to taste

For fried yellow egg noodle:

1 1/2 packet yellow egg noodle
1 tbsp canola/vegetable/ peanut oil
2 cloves garlic, diced of finely chopped
1tbsp oyster or hoisin sauce
3 tsp sesame oil
3 tsp light soy sauce
some white pepper
1 tsp caster sugar/ brown sugar
1 1/2 tbsp water

To prepare tangy chili prawns:

1. Fry streaky bacon without any oil until they are golden brown. Remove excess oil from wok or pan and leave about 2-3 tsp of bacon oil behind. Set bacon aside.

2. At this point, wok or pan will still be hot. Add the oil then fry garlic, onions and chili for few seconds until they are fragrant.

3. Then add the prawns, sherry or rice wine and the lime juice and stir fry until the prawns start to turn pink.

4. Add  the French beans and  bacon and mix together. When prawns have turned pink, season with a little salt, white pepper and a pinch of chili flakes. Set aside.

To prepare fried yellow egg noodles:

1. Combine all the ingredients and mix well  leaving out garlic and yellow egg noodles.

2. Heat a clean pan or wok, add oil and fry garlic for a couple seconds making sure they don't burn.

3. Immediately toss in yellow egg noodles and pour noodle mixture and stir fry for 1-2 minutes until noodles are evenly coated. Add a little water (2-3 tsp) if noodle is too try.

4. Lastly, add in the fried tangy prawn and mix it up with the noodle. Serve immediately.

xx
Related Posts Plugin for WordPress, Blogger...