When it comes to sharing the love and joy, I love turning to classics when I bake. It seems safe, but trust me nobody could resist a good old ultra moist fluffy chocolate cake, filled with ooey gooey dark chocolate ganache filling and frosted with old fashion vanilla butter cream.
I suppose you could say I am one who treasures my past, and present. While baking these cupcakes, the first thing that came to my mind is Audrey Hepburn in her Breakfast at Tiffany's advert. The whole black and white, is just so chic and classy. Since coming across the advert while I was just a mere young lady, I told myself that I would love to grow up to be refined and poise. Not quite sure if that worked out though..LOL.
Anyways, back to my Mistletoe Cupcake. Honestly, I don't know what to call them, and since I have always wanted to decorate with a mistletoe, I thought it would be a great idea to name my cuppies just as it is. For the love birds, you could say that I am creating a moment for you to get your kiss..Forgive me if I sounded lame. Then again, we are just a reserved bunch of people. So no kisses here tonight peeps! Hmmmph..[do I sense some raised eye brows?!?]
By the way, there won't be any recipe card, this time round. For recipe, please click on Chocolate Ganache Cupcake and here for the Old Fashion Vanilla Butter cream [note: do omit the lemon juice]. However, I have a virtual card to all of you readers whom I called you my foodie friend. Thanks for all the support through out the months and I do hope you will be back for more. Till then!!
xx
Showing posts with label vanilla butter cream. Show all posts
Friday, December 23, 2011
Thursday, November 3, 2011
Baking Recipe: Sneaky Vanilla Vanilla Cupcakes and Frisco Here I come
As you all may already know, Foodbuzz Festival is happening this Friday November 4th, 2011 in San Francisco. I'm just getting more and more excited as I count down the hours.
Amidst from my busy schedule to clear my work, I can't bear to leave you with nothing. I have been contemplating whether to post this, since after all the recipe isn't mind. Perhaps you can treat it as a recipe review instead? I figured I better not post it up here as I might get into legal or copyright trouble and the whole lot; if you get what I mean. However, if you like The Hummingbird Bakery, then maybe you might have their baking recipe book. The vanilla cake and vanilla butter cream is adapted from their lovely book titled "Cake Days".
![]() |
| Disclaimer: Photo displayed is taken from The Humming Bird website. I do not own this photo nor it's for promotional purposes. |
I have to say, I might have just found myself a new vanilla cake recipe that I like. It's moist and really aromatic. The whole house smells like vanilla when it's freshly baked out of the oven. Thinking of it now is making me drool.
Sneaky Vanilla Vanilla Cupcakes came upon when I received an order recently whereby my customer's kids adores any cake flavour except for chocolate cakes. To top that, they love heaps of frosting.
So I thought why not I bake them a real vanilla vanilla cupcake. Vanilla in the cake and vanilla in the butter cream. Who don't like vanilla? After all it's an epitome of a classic flavour. Simple, rich and aromatic. I could really just lick vanilla butter cream off my fingers if I had the opportunity.
Also it's my first time having to bake for boys. A thrilled indeed cause then I got to stay away from the colour pink. Plus to make it slightly extra special, I've decided to try my hands on using ready rolled fondant. To my surprise I am loving the fondant I bought from the bakery. It's not overly sweet. Which means I get to either make my frosting with regular sweetness or tone it down depending on my customer's preference. I don't have the skill to mold any figurines yet. For that I thought lets make them some sneaky smiley faces.
What do you think? Does this put a smile of your face? Keep this smile on okay? Cause I can't wait to show you San Francisco through my eyes.
Till then everyone, I will be back so don't stop buzzing me over here at my blog. Give me a holler!!
xx
Monday, August 15, 2011
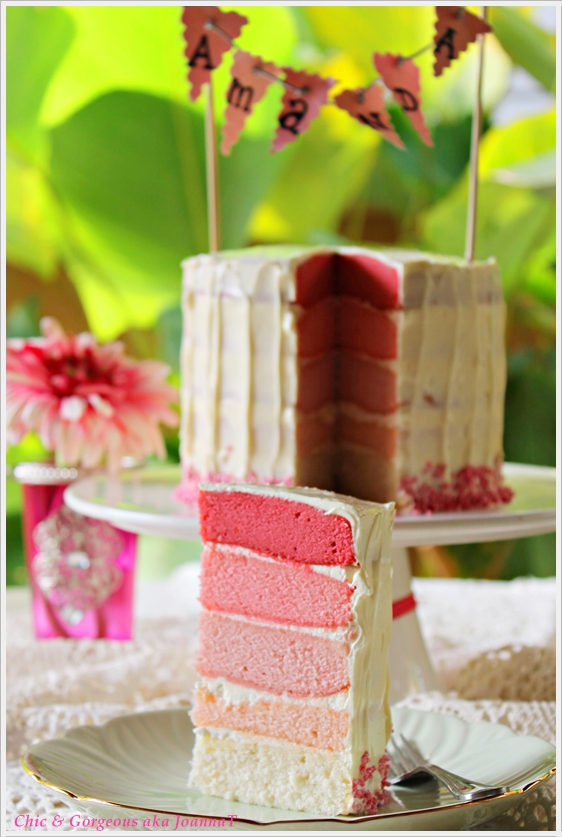
Baking Recipe: Amanda's Pink Rainbow Cake
I am so happy to introduce my sweet little niece to you. It was her big day, her Full Moon. Being an aunt [I felt older for a moment.. still young at heart nevertheless ;)] to her means I have the privilege to prepare her lots of good healthy meals and also to share with her my passion. I am recording this day for her and hopefully when she's older she will look back to know that she's a fortunate little girl who have lots of love from her family, where by her arriving in to this world has touched my heart.
![]() |
| For Recipe: click on image + zoom |
| Disclaimer: Picture courtesy from Pei Li's Miniature, please do not copy and reproduce, TQ. |
xx
Labels:
baking recipe,
cake,
recipe,
vanilla,
vanilla butter cream,
vanilla cake
Wednesday, June 15, 2011
Baking Recipe: Robin's Egg Blue Wedding (White Chocolate Chip Butter Cake + Vanilla Orange Buttercream)
Don't you just love the colour blue? And I mean not any colour blue.. to be specific Robin's Egg Blue. I really love this colour and found it to be rather calm, relaxing and adds some vintage flare.
Before it slip off my mind, to digress.. Lisa from Sweet As Sugar Cookies have invited me to join in the Treats Party. I've linked up 2 desserts of mine (Creamy Lemon Cheesecake and Scrumptious Strawberry Tarts). So go check out Lisa's website too if you love to get a sugar rush like I do.
Okay, now back to where I left off.. Over the weekend, I had a tiny project. Originally was to bake a 2 tier wedding cake, but I decided to make it a small 6 inches single tier cake with other tiny cuppies. Have not made those little ones in a while now.
To be honest, I really had no idea on how to decorate. I sketched so many designs and at the end of the day, I didn't even stick to what I drew, typical of me...LOLs. Instead, I decided that the cake has to be rustic and full shabby chic-ness. No clue what to call the cake yet, but I thought "Robin's Egg Blue" sounds catchy. What do you think?
At the end, the designs were impromptu, and if you love a good white butter cake, read on for recipe. Enjoy!
1/4 teaspoon salt
1/2 cup unsalted butter, at room temperature
1 cup caster sugar, divided
1-2 teaspoon pure vanilla extract
1/2 cup milk
1/8 teaspoon cream of tartar
1/2 cup semi dark chocolate chips (optional)
To prepare white butter cake:
1. Preheat oven at 350 degrees approx 177-180 Celsius. Grease 2 6-inches round cake pan and line with parchment paper. With a whisk and clean mixing bowl, whisk egg whites until foamy. Then add in cream of tartar and 1/4 cup sugar and continue to whisk until stiff peaks forms. Transfer to another bowl, if you do not have a spare mixing bowl.
2. In a separate bowl, mix cake flour, salt, and baking flour together. Next, change to a paddle attachment, beat butter and remainder of 3/4 cup sugar at medium speed until light, creamy and fluffy.
3. Add egg yolks, one at a time, beating after each addition. Scrape down the sides of the bowl. Add the vanilla extract and beat until combined. Divide cake flour mixture to 3 additions, starting with milk and ending with flour and continue mixing until well combined.
4. With a rubber spatula, gently fold in beaten egg whites into cake batter, and fold until well combine. Toss in chocolate chips (optional) and careful to not over mix and lose all the air. Otherwise cake will deflate.
5. Bake for 25-30 minutes or until a skewer or toothpick inserted comes out clean. Set aside to cool before transferring to a wire rack to cool off completely.
For vanilla butter cream with hint of orange flavour
4-5 tbsp of orange juice (freshly squeeze)
3-4 cups of icing sugar (or just enough for taste of frosting consistency)
1 1/2 stick of unsalted butter
1/2 stick salted butter
2 tsp of vanilla extract
1 cup milk
5 tbsp all purpose flour
To prepare orange vanilla butter cream:
1. With a paddle attachment, whisk butter until light, fluffy and creamy.
2. Add in icing sugar a little at a time, as you may not need 4 cups of icing sugar.
3. Turn speed down to slow to add in orange juice and vanilla extract. Then turn the speed up again and continue to whisk until frosting double in volume, as it'll be light and fluffy.
4. In a saucepan, heat up milk but not to boiling point. Let cool slightly, then toss in flour all at once and stir vigorously, until milk and flour is incorporated. You will notice that the liquid will thicken up and return to stove and let mixture simmer, while continue stirring.
5. Once liquid is thicker, let cool for a couple of minute. With a sieve, press the thicken liquid through into the butter cream. Discard the lumps. Turn the mixer back up and whisk the butter cream for the last time for 2-3 minutes until well incorporated.
xx
Before it slip off my mind, to digress.. Lisa from Sweet As Sugar Cookies have invited me to join in the Treats Party. I've linked up 2 desserts of mine (Creamy Lemon Cheesecake and Scrumptious Strawberry Tarts). So go check out Lisa's website too if you love to get a sugar rush like I do.
Okay, now back to where I left off.. Over the weekend, I had a tiny project. Originally was to bake a 2 tier wedding cake, but I decided to make it a small 6 inches single tier cake with other tiny cuppies. Have not made those little ones in a while now.
To be honest, I really had no idea on how to decorate. I sketched so many designs and at the end of the day, I didn't even stick to what I drew, typical of me...LOLs. Instead, I decided that the cake has to be rustic and full shabby chic-ness. No clue what to call the cake yet, but I thought "Robin's Egg Blue" sounds catchy. What do you think?
At the end, the designs were impromptu, and if you love a good white butter cake, read on for recipe. Enjoy!
Recipe
For white butter cake
adapted from Joy of Baking
2 large eggs, separated
1 3/4 cups sifted cake flour
2 teaspoons baking powder1/4 teaspoon salt
1/2 cup unsalted butter, at room temperature
1 cup caster sugar, divided
1-2 teaspoon pure vanilla extract
1/2 cup milk
1/8 teaspoon cream of tartar
1/2 cup semi dark chocolate chips (optional)
To prepare white butter cake:
1. Preheat oven at 350 degrees approx 177-180 Celsius. Grease 2 6-inches round cake pan and line with parchment paper. With a whisk and clean mixing bowl, whisk egg whites until foamy. Then add in cream of tartar and 1/4 cup sugar and continue to whisk until stiff peaks forms. Transfer to another bowl, if you do not have a spare mixing bowl.
2. In a separate bowl, mix cake flour, salt, and baking flour together. Next, change to a paddle attachment, beat butter and remainder of 3/4 cup sugar at medium speed until light, creamy and fluffy.
3. Add egg yolks, one at a time, beating after each addition. Scrape down the sides of the bowl. Add the vanilla extract and beat until combined. Divide cake flour mixture to 3 additions, starting with milk and ending with flour and continue mixing until well combined.
4. With a rubber spatula, gently fold in beaten egg whites into cake batter, and fold until well combine. Toss in chocolate chips (optional) and careful to not over mix and lose all the air. Otherwise cake will deflate.
5. Bake for 25-30 minutes or until a skewer or toothpick inserted comes out clean. Set aside to cool before transferring to a wire rack to cool off completely.
For vanilla butter cream with hint of orange flavour
4-5 tbsp of orange juice (freshly squeeze)
3-4 cups of icing sugar (or just enough for taste of frosting consistency)
1 1/2 stick of unsalted butter
1/2 stick salted butter
2 tsp of vanilla extract
1 cup milk
5 tbsp all purpose flour
To prepare orange vanilla butter cream:
1. With a paddle attachment, whisk butter until light, fluffy and creamy.
2. Add in icing sugar a little at a time, as you may not need 4 cups of icing sugar.
3. Turn speed down to slow to add in orange juice and vanilla extract. Then turn the speed up again and continue to whisk until frosting double in volume, as it'll be light and fluffy.
4. In a saucepan, heat up milk but not to boiling point. Let cool slightly, then toss in flour all at once and stir vigorously, until milk and flour is incorporated. You will notice that the liquid will thicken up and return to stove and let mixture simmer, while continue stirring.
5. Once liquid is thicker, let cool for a couple of minute. With a sieve, press the thicken liquid through into the butter cream. Discard the lumps. Turn the mixer back up and whisk the butter cream for the last time for 2-3 minutes until well incorporated.
xx
Wednesday, May 25, 2011
Baking Recipe: LadyBug Cake
I don't think there's a LadyBug cake out there. Or is there? Have you come across any? I must say, this cake is a random cake recipe whereby I mesh a couple of flavours together; which in my opinion works out quite well. There were a couple of cake recipe I learnt by browsing through recipe books or other foodie blogs. So I thought why not I challenge myself to bake a cake with my own mesh up of recipe, lol..
In a nutshell, this cake resembles a slight base of an Opera Cake. The cake is an almond sponge cake (joconde) but instead of coffee cream, it has been replaced with vanilla bean cream and in between is sandwich with a decadent raspberry-strawberry jelly between layers. This adds a pop of colour to the cake.
Try it out when you have got lots of time in your hands and tell me what you think. Enjoy~
Recipe:
For the almond sponge cake
adapted from Chef Jean Francois Arnaud
100g finely ground almond
55g icing sugar
30g all purpose flour/ cake flour
3 egg whites (keep the yolks)
65g caster sugar
3 whole eggs
20g butter, melted
1/2 -1 tsp vanilla extract
To prepare almond sponge:
1. Preheat oven to 220 Celsius. Line an 8 inches round baking dish with parchment paper and coat the sides with Wilton cake release or butter.
2. Sift together ground almond, icing sugar and flour.
3. Whisk the egg whites in the stand mixer until it sets in foamy soft peaks.
4. Add caster sugar a spoon at a time and continue to whisk for a few more seconds.
5. Next, add whole eggs and mix them well.
6. Fold in the almond and flour mixture into the egg mixture. To that add in the melted butter and mix until mixture is smooth. Pour onto the baking dish and bake for about 8-10 minutes or until a tooth pick inserted comes out clean. Transfer cake to a wire rack and let it cool completely before refrigerating the cake.
For the raspberry-strawberry layers:
adapted from Tartelette Blog
2 tbsp powdered gelatin
1/4 cup cold water
2 cups frozen raspberries
2 cups frozen strawberries
1/2 cup sugar
To prepare raspberry-strawberry layers:
1. Line a shallow round dish, about (7-8 inches) with parchment paper.
2.Sprinkle the gelatin over the cold water and reserve.
3. In a large saucepan set over medium low heat, bring the raspberries, strawberries and sugar to a simmer and cook until the berries are completely thawed and reduced to a puree (smash them down with a spoon if necessary) and the sugar is dissolved.
4.Remove from the heat and add the gelatin, stirring until it completely dissolved in the raspberries. Pour over the prepared shallow dish. Let cool to room temperature and then freeze until firm.
For the vanilla bean cream:
250ml/ 1 cup whole milk
1 vanilla pod
6 egg yolks (used 3 from the remaining egg whites)
180g/ 3/4 cups caster sugar
350g butter/ approx. 11/4 cup, softened
To prepare vanilla bean cream:
1. Combine milk and vanilla pod in a small saucepan and bring to a boil.
2. In a mixing bowl, whisk egg yolks and sugar until pale.
3. Strain the vanilla milk mixture and gently pour into the yolk mixture while whisking. Make sure to not pour directly over the whisk, and pour down the sides of mixing bowl, to avoid having scramble eggs. Mix well and pour the mixture back into a saucepan.
4. Cook under medium heat, stirring constantly until it thickens. A tip, you could actually feel the spatula getting slightly heavier.
5. Strain immediately into a flat tray and allow to cool to room temperature.
6. With a paddle attachment, pour the mixture into a stand mixer and at medium speed, beat in the butter, 1 cube at a time. At first the mixture will still be diluted, however, don't worry, continue to add in the butter and you will notice the mixture will slowly turn into cream consistency. Once thicken, whisk it as high speed for a couple of seconds and now your cream is ready. It should be smooth, thick and light with no lumps.
For chocolate glaze:
adapted from Chef Jean Francois Arnaud
100g dark chocolate, melted
120g UHT cream
180g caster sugar
145ml water
60g cocoa powder
11g gelatin powder, softened in 50ml water
To prepare chocolate glaze:
1. Soak gelatin in room temperature water/ cold water is fine.
2. Boil the cream, sugar and water in a small saucepan. Add in the cocoa powder. Whisk for 2 mins on the heat and add the soaked gelatin; stir until dissolve. Remove from heat, cooling it at room temperature, and then transfer to the refrigerator.
To assemble cake:
1. Remove almond sponge from the refrigerator. Peel off parchment paper and with a serrated knife, slice the cake carefully and thinly into 3 layers.
2. Spread the bottom sponge layer with vanilla bean cream and then top with second layer of sponge, and spread another layer of vanilla bean cream.
3. Meanwhile, remove the raspberry-strawberry jelly and place it over the vanilla bean cream which was spread on second layer of sponge. Top with the third sponge layer and spread cover the whole cake with vanilla bean cream.
4. Melt the chocolate glaze in microwave oven on defrost setting for just a couple of minutes (approx 2-3mins, be careful not to let chocolate burn) and pour over the cake. Chill in the refrigerator to let glaze set and thaw before serving.
xx
In a nutshell, this cake resembles a slight base of an Opera Cake. The cake is an almond sponge cake (joconde) but instead of coffee cream, it has been replaced with vanilla bean cream and in between is sandwich with a decadent raspberry-strawberry jelly between layers. This adds a pop of colour to the cake.
Try it out when you have got lots of time in your hands and tell me what you think. Enjoy~
Recipe:
For the almond sponge cake
adapted from Chef Jean Francois Arnaud
100g finely ground almond
55g icing sugar
30g all purpose flour/ cake flour
3 egg whites (keep the yolks)
65g caster sugar
3 whole eggs
20g butter, melted
1/2 -1 tsp vanilla extract
To prepare almond sponge:
1. Preheat oven to 220 Celsius. Line an 8 inches round baking dish with parchment paper and coat the sides with Wilton cake release or butter.
2. Sift together ground almond, icing sugar and flour.
3. Whisk the egg whites in the stand mixer until it sets in foamy soft peaks.
4. Add caster sugar a spoon at a time and continue to whisk for a few more seconds.
5. Next, add whole eggs and mix them well.
6. Fold in the almond and flour mixture into the egg mixture. To that add in the melted butter and mix until mixture is smooth. Pour onto the baking dish and bake for about 8-10 minutes or until a tooth pick inserted comes out clean. Transfer cake to a wire rack and let it cool completely before refrigerating the cake.
For the raspberry-strawberry layers:
adapted from Tartelette Blog
2 tbsp powdered gelatin
1/4 cup cold water
2 cups frozen raspberries
2 cups frozen strawberries
1/2 cup sugar
To prepare raspberry-strawberry layers:
1. Line a shallow round dish, about (7-8 inches) with parchment paper.
2.Sprinkle the gelatin over the cold water and reserve.
3. In a large saucepan set over medium low heat, bring the raspberries, strawberries and sugar to a simmer and cook until the berries are completely thawed and reduced to a puree (smash them down with a spoon if necessary) and the sugar is dissolved.
4.Remove from the heat and add the gelatin, stirring until it completely dissolved in the raspberries. Pour over the prepared shallow dish. Let cool to room temperature and then freeze until firm.
For the vanilla bean cream:
250ml/ 1 cup whole milk
1 vanilla pod
6 egg yolks (used 3 from the remaining egg whites)
180g/ 3/4 cups caster sugar
350g butter/ approx. 11/4 cup, softened
To prepare vanilla bean cream:
1. Combine milk and vanilla pod in a small saucepan and bring to a boil.
2. In a mixing bowl, whisk egg yolks and sugar until pale.
3. Strain the vanilla milk mixture and gently pour into the yolk mixture while whisking. Make sure to not pour directly over the whisk, and pour down the sides of mixing bowl, to avoid having scramble eggs. Mix well and pour the mixture back into a saucepan.
4. Cook under medium heat, stirring constantly until it thickens. A tip, you could actually feel the spatula getting slightly heavier.
5. Strain immediately into a flat tray and allow to cool to room temperature.
6. With a paddle attachment, pour the mixture into a stand mixer and at medium speed, beat in the butter, 1 cube at a time. At first the mixture will still be diluted, however, don't worry, continue to add in the butter and you will notice the mixture will slowly turn into cream consistency. Once thicken, whisk it as high speed for a couple of seconds and now your cream is ready. It should be smooth, thick and light with no lumps.
For chocolate glaze:
adapted from Chef Jean Francois Arnaud
100g dark chocolate, melted
120g UHT cream
180g caster sugar
145ml water
60g cocoa powder
11g gelatin powder, softened in 50ml water
To prepare chocolate glaze:
1. Soak gelatin in room temperature water/ cold water is fine.
2. Boil the cream, sugar and water in a small saucepan. Add in the cocoa powder. Whisk for 2 mins on the heat and add the soaked gelatin; stir until dissolve. Remove from heat, cooling it at room temperature, and then transfer to the refrigerator.
To assemble cake:
1. Remove almond sponge from the refrigerator. Peel off parchment paper and with a serrated knife, slice the cake carefully and thinly into 3 layers.
2. Spread the bottom sponge layer with vanilla bean cream and then top with second layer of sponge, and spread another layer of vanilla bean cream.
3. Meanwhile, remove the raspberry-strawberry jelly and place it over the vanilla bean cream which was spread on second layer of sponge. Top with the third sponge layer and spread cover the whole cake with vanilla bean cream.
4. Melt the chocolate glaze in microwave oven on defrost setting for just a couple of minutes (approx 2-3mins, be careful not to let chocolate burn) and pour over the cake. Chill in the refrigerator to let glaze set and thaw before serving.
xx
Subscribe to:
Posts (Atom)